The Development of Editing
Film technology has evolved over time and at the same time editing has changed and developed.
History of cinema:
This video explains the vastly complex history of the origins of cinema.
The origins of cinema are linked to the work of Eadweard Muybridge. His interest was in how things move. In order to work out how both animals and humans move, he decided to use a series of cameras to create a sequence of stills which when played back give the illusion of movement if played back at a certain speed.
Below is an example of his work which was the first film ever made which shows a race horse running which was made in 1878.
There was an thought amongst some people on whether when a horse runs if all of its legs lift off the ground at the same time at some point, so Eadweard Muybridge came up with the idea to make a film using a series of still images which show a horse running and when he played it back at a speed it proved that all four horses legs lift off the ground at some
point when they run.
So when you play back a sequence if images at a rate of 24 frames per second the brain will believe that they are all images of a single thing that is moving rather than a series of images. If you click on the link below it will take you to a video which explains frames and frame rates.
http://www.video2brain.com/en/lessons/frame-rates
We still use the idea of frame rate to adjust the speed of the image in both production and post production.
 The first machine patented in the United States that showed animated pictures or movies was a device called the "wheel of life" or "zoopraxiscope". Patented in 1867 by William Lincoln, moving drawings or photographs were watched through a slit in the zoopraxiscope. However, this was a far cry from motion pictures as we know them today. Modern motion picture making began with the invention of the motion picture camera.
 The Frenchman Louis Lumiere is often credited as inventing the first motion picture camera in 1895. But in truth, several others had made similar inventions around the same time as Lumiere. What Lumiere invented was a portable motion-picture camera, film processing unit and projector called the Cinematographe, three functions covered in one invention. The image on the right is an example of Lumiere's invention.
The Cinematographe made motion pictures very popular, and it could be better be said that Lumiere's invention began the motion picture era. In 1895, Lumiere and his brother were the first to present projected, moving, photographic, pictures to a paying audience of more that one person.

This images shows someone using Lumiere's invention to capture a motion picture of small children playing in a garden.
The Lumiere brothers were not the first to project film. In 1891, the Edison company successfully demonstrated the Kinetoscope, which enabled one person at a time to view moving pictures. Later in 1896, Edison showed his improved Vitascope and it was the first commercially, successful, projector in the U.S.
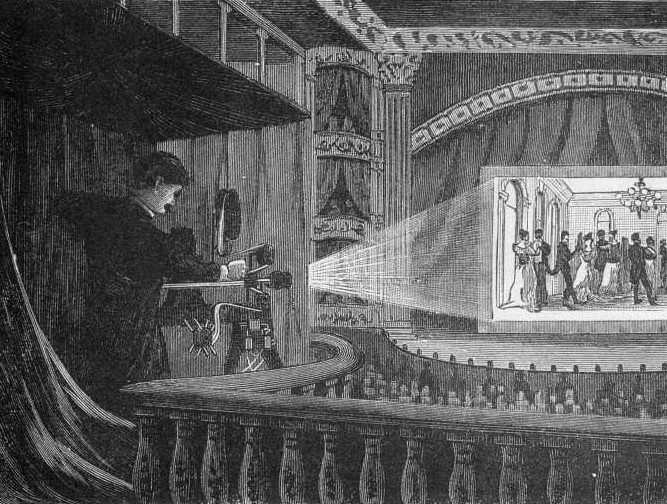
This image shows Edison using his invention to project a film in a old theatre to a audience.
The first films created with these cameras were not edited. They were usually one single shot, from a single point of view.
The idea that you could use a variety of shot choices, use multiple points of view, and that the story could follow the action, didn't come about until the concept of editing in camera was invented.
Editing in camera means that the film is created shot by shot, in the camera. You add the next shot in the story by filming it next. Editing in camera still exists as a way of creating films.
For example the video below was created in 1902 which is an example of a video which was editing in camera.
Editing:
Editing in camera was never going to be good enough, it is very difficult to assemble a finished film in camera. Judging where each shot should start and finish is just too hard to get perfectly right each time. Therefore the early film makers needed a way to trim shoots and to alter the order of a shorter section of film called clips.
In the early days of movie production, the idea of cutting up film and taping it back together to edit it was developed. For many years this process was done by hand, with just a pair of scissors and a magnifying glass.
The first mechanical editing desks, used to cut up and reassemble movies were invented by Iwan Serrurier in 1924. He was the founder of the Moviola company.
This Video explains the history of the Moviola Company.
These machines revolutionised editing and allowed more sophisticated cutting techniques to be developed.
This technique of cutting film and reassembling the pieces, whether done by hand or by machine is called "Linear Editing". It is called linear editing because you are basically putting the clips in order one after the other. This process is purely mechanical.
From 1920 until the end of the second world war, film diting was done almost exclusively on Moviola decks. Then in 1945 the German company Steenback introduced their machine. Steenbeck's rapidly became the industry standard.

This process of cutting film continues to this day. Steenbeck still produce and sell film editing decks.
Since 1953 STEENBECK is manufacturing film editing tables for the motion picture industry.
For more than 60 years Steenbeck has been setting a mark and has been trend setter for quality and precision in this branche.Many developments were made for all kinds of special applications, film editing, telecine, viewing and checking motion picture film and even X-ray films in hospitals. In 2003 STEENBECK moved from Hamburg/Germany to Venray/Holland in the Dutch province Limburg, specifically in an Industrial High Tech Park near the Dutch motorway A73 that connects Germany to Amsterdam.
The image on the right hand side is an example of an early model of a Steenbeck Table. Throughtout time they have developed and became more modern in their way of working.
Invention of Video Editing:
 The idea of recording to something other than film (video tape) was invented in 1951 by the Ampex research team. The first video editing machines came into existence a few years later in 1956.In 1956 Ampex stepped up with the VR-1000. While not the first Video Tape
Recorder (VTR), the VR-1000 was the first, practical, broadcast quality
recorder.The VR-1000 recorded a black and white picture with a mono
audio channel on a 2" wide video tape. The tape ran at a familiar and economical
15-inches per second. The picture was recorded across the tape from top to
bottom using four heads on a rotating drum (Quadruplex recording). This
arrangement gives an effective video recording speed of approximately 1560
inches per second.
The idea of recording to something other than film (video tape) was invented in 1951 by the Ampex research team. The first video editing machines came into existence a few years later in 1956.In 1956 Ampex stepped up with the VR-1000. While not the first Video Tape
Recorder (VTR), the VR-1000 was the first, practical, broadcast quality
recorder.The VR-1000 recorded a black and white picture with a mono
audio channel on a 2" wide video tape. The tape ran at a familiar and economical
15-inches per second. The picture was recorded across the tape from top to
bottom using four heads on a rotating drum (Quadruplex recording). This
arrangement gives an effective video recording speed of approximately 1560
inches per second. The original editing systems we're also linear editing systems. However, instead of physically cutting the video tape the data was copied from one tape to another, via a control deck which would control the in and out points (start and finish) of the clip you wanted to copy across.
At this point both the image quality and editing techniques were very primitive. They were used primarily for TV usage. Neither the picture quality or the editing techniques were suitable for cinema use.
The first feature film shot on video was Julie and Julia 1987. The first commercial movie shot in HD was 2004 Once Upon A Time in Mexico.
Non-Linear Editing Systems (NLE):
The first attempts to create non-linear editing systems were in the 1970's, but no one was able to bring a commercial system to the market. Lucasfilm started to develop a system in the 1980's, with their EditDroid (a system based on laser disc technology). This, however, never turned turned into a commercial system.
 However, the first commercially sucessful, professional NLE systems were created in 1989, when AVID launched the Avid 1 Media composer editing system. The Avid editing system was a hardware + software system based on Apple computing technology. This was the first computer based system that turned taped data into files. Files that could be then moved about on a timeline. One of the major developments which allowed this to happen was the creation of digital video cameras. The first professional camera, the Sony D1, coming onto the market 1986.
 What allowed this to change from linear to non-linear, was the idea that the footage either on film or video, could be transformed into digital information could then be altered without destroying the original file. This is known as non-destructive editing.
Once the images were digital, it became possible to alter and manipulate that data (images) in ways that were impossible using linear editing systems.
Purpose
Storytelling
Whether it is drama, news or documentary the purpose of editing is the same - effective storytelling.
We do this by controlling the audiences point of view. The shots we create in production need to be exactly what we need to tell the story in the edit.
Genre = this is how film is defined by either its content or its style for example some genres include; Thriller, Horror, Comedy, Romance, Action, Sci Fi etc.
This is the trailer for Star Wars Revenge of the Sith. The genre of this film is Sci Fi, the reason for this is because of the various codes and conventions for Sci Fi films which can be seen throughout this clip. For example some of the codes and conventions for Sci Fi films are; Aliens, Futuristic buildings, Flying cars, Sound effects, Robots etc.
This is the Blades of Glory trailer. The genre of this film is comedy.
When comparing these two genres they are completely different to each other. For example a difference with these two movie trailers is the setting of them, as one is set in the future and the other is set in the modern day. Also the language in the two clips are completely different as one is more based upon jokes and modern language and the other one uses more futuristic terminology.
Conventions and Techniques
Montage = A montage is a sequence to show a characters development through time. For example the clip below is a montage from Harry Potter showing how he has changed throughout the time in each of the 7 films.
This montage shows how much Harry and the other characters have changed from the very first film to the very last.
Screencasts:
This is a screencast of me editing a cut away into a interview. First I opened Final Cut Pro and then I clicked on file-import-from files and I chose some clips from the data file on the computer and I chose two different clips. I then took one clip and set the in and out points and then I dragged it onto the timeline over the top of my other clip which I had already placed on the timeline and then I made sure the audio for the clips was off.
This screencast shows me adding a dissolve transition between two different clips.First I opened Final Cut Pro and then I clicked on file-import-from files and I chose some clips from the data file on the computer and I chose two different clips. I then took one clip and set the in and out points and then I dragged it onto the timeline and then I done the same with the other clip and place it onto the timeline next to the other clip. I then went to the toolbar at the top and went to effects and down to video transitions and then down to dissolve and then I chose the one I would use and then I placed it in between the two clips and then I played it back to see how it looked.
In this screencast I set the in and out points on a clip of footage and then placed it onto the timeline.First I opened Final Cut Pro and then I clicked on file-import-from files and I chose some clips from the data file on the computer and I chose a clip of footage I was going to use, I then played the clip through and when I found where I wanted my footage to start I pressed the 'i' key down on the keyboard to set the in point and then I carried on playing the clip til I found where I wanted it to stop and then I pressed the 'o' key on the keyboard to set the out point. Once I had done that I dragged the clip onto the timeline.
In this screencast it shows me adding a wipe transition between two different clips of footage. First I opened Final Cut Pro and then I clicked on file-import-from files and I chose some clips from the data file on the computer and I chose two different clips. I then took one clip and set the in and out points and then I dragged it onto the timeline and I then done the same with the other clip and place it next to the other one on the timeline. I then went to effects-video transitions-wipe and chose out of the list and then I placed it between the two footage clips and played it back to see what it looked like.
This video tutorial shows you how to add a soundtrack to a video in Final Cut pro. It also explains how to fade out the sound as well as how to cancel out the audio from the clip so you can hear the background music.


